Posts Tagged ‘soy-free’
April 9, 2014
The other day I was going through what I had in the fridge that needed to be used. I’d made a large pot of garbanzo beans over the weekend and used some for curry and some more for chili, but there were still almost 2 jars left. I thought about freezing them, but I really needed to make something easy to eat for the next couple of days. (Caring for an infant and trying to work part time from home makes it hard to find time to cook for every meal!) I thought about what would be easy to eat, and decided to make falafel.
I checked out a few recipes on line, but most of them used ingredients I didn’t have on hand, started with the dry garbanzos, or used ingredients I’m avoiding. Most of them are also pan fried in oil. I realized that it was really just a matter of mixing cooked garbanzos with spices, a binder, and cooking them. This is what I ended up with, and they came out quite good if I do say so myself. (Hubby agrees!)
Easy Vegan Falafel
Ingredients
- 3 cans garbanzo beans (chickpeas) drained and rinsed (or about 6 cups of cooked dry garbanzo beans.)
- 1/2 cup + 1 T tahini
- 6T ground flax seed
- 1 7/8 t baking powder (just under 2 t)
- 3/8 cup dehydrated onion flakes (fresh diced onion would probably work too, but might require a bit more flour later)
- 3/8 cup dried cilantro (again, if using fresh you might need more flour later.)
- 3t cumin
- 3 cloves garlic, chopped (about 3t)
- 3t coriander
- 3t chili powder
- 3/4t salt
- 3t lemon juice
- 6 drops doTERRA lemon essential oil (or 6T lemon zest, but again…you may need more flour later.)
- 3/4 cup gluten free flour (I used Bob’s Red Mill Gluten Free Baking Mix because I had some that I had no plans for, but any type should work.) (You may need slightly more or slightly less depending on the moisture of your ingredients and how humid it is.)
- Olive oil (for greasing the pan and brushing on top.)
Directions
- Preheat the oven to 450*F
- Place all of the ingredients, except for the flour and oil, into your vitamix with the garbanzos on the bottom. (If you don’t have a vitamix, a food processor or stick blender would probably do an adequate job.)
- Blend or process the ingredients until they’re combined and a bit pasty. You don’t want a puree, so make sure you leave some chunks! Scrape down the sides or use your tamper often.
- Scrape the mixture into a mixing bowl
- Add the flour a little bit at a time until the mixture is somewhat dry (when you make a ball and flatten it the edges should crack a little bit.) If your mixture was already quite dry you may not need all of this. (I only needed 1/2 cup when using all of the drier ingredient options.)
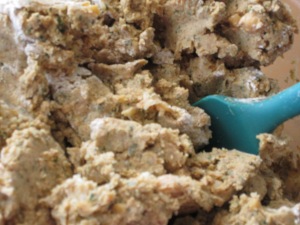
You can see that it’s pretty dry.
- Form patties from the dough. I didn’t measure each patty, but I’d say each used about 2-3T of dough…a small handful. Roll each portion into a ball and flatten slightly to make a thick patty.
- Liberally oil a baking sheet (this could be skipped if you are avoiding oil, but make sure to use parchment paper or another method of avoiding food sticking to the pan.)
- Place the patties on the baking sheet, making sure they aren’t touching.
- Brush a little bit of oil over the tops of the patties.
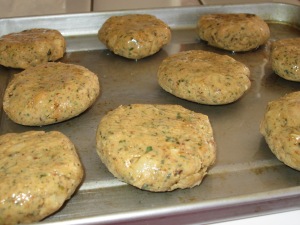
Falafel patties ready to be baked. (This is a toaster oven pan…they aren’t huge!)
- Bake for 25 minutes, flipping over halfway through
- Serve on its own, over a salad, or in a wrap (I prefer over a salad with the sauce/dressing I’ve shared below.)
- Makes 5 servings of 6 patties each
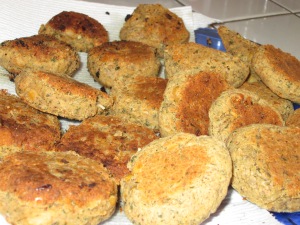
The ones to the back/left were pan fried (hubby though he’d prefer them that way, but he didn’t!)
Vegan Falafel Sauce
Ingredients
- 1 cup soy free veganaise
- 3/4 cup relish
- 3t lemon juice
- 1 1/2t chopped garlic
- 3/8t black pepper
- 3/8t celery seed
Directions
- Stir all ingredients together in a bowl with a fork.
- Serve over Falafel.
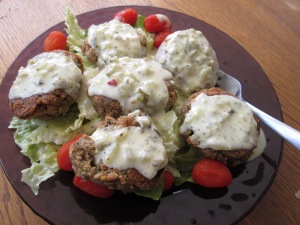
Yummy! (Ignore the shriveled tomatoes…I told you I was cleaning out the fridge!)
These were yummy fresh from the oven, and cold the next day as well. If you want them warm as leftovers, I recommend waiting to bake them until the day you want to eat them. Being heated twice dries them out a bit (but they’re still yummy!) This was a quick nutritious meal I could eat one handed while holding the baby, and beyond the intial (pretty fast) prep, doesn’t take much time to get ready to eat.
Tags:chickpeas, Falafel, garbanzo beans, gluten-free, soy-free, Vegan
Posted in Dinner, Lunch, Recipes | 11 Comments »
May 22, 2013
So, some of you might be wondering why I didn’t go through with the biopsy after going through the gluten challenge (which was my full intent to have a definite answer.) The answer is that I’m pregnant! We are thrilled, and I so am avoiding gluten (and everything else I can’t eat) and at some point in the future I may do another challenge for a biopsy. On the plus side, my thyroid levels have continued to be in the subclinical range, B12 is more than adequate, and other blood work looked good. The only thing of concern is that my vitamin D is very low again. I’ve doubled my vitamin D supplement, and hopefully will get back to a good level quickly.
It’ll be fun to see what recipes I end up making and creating over the next several months, so stick around!
My favorite protein packed breakfast lately is an orange creamsicle type smoothie.
Ingredients:
» 2-3 oz by weight of your favorite nuts or seeds (my favorite is to use half of each: raw hemp seeds and raw pumpkin seeds)
»1-1.5 cups of water
»1 frozen banana (unfrozen can work too…)
»1 teaspoon vanilla extract
»6 ounces (half a can) frozen orange juice concentrate
»1-2 cups of ice
Directions:
» In a high powered blender (I use a Vitamix) blend the seeds and/or nuts with the water on high until smooth.
» Add the banana, vanilla, and orange juice concentrate to the blender and again run the blender on high until smooth.
»Add ice to the blender until the total volume reaches the 4 cup mark, then blend one last time on high.
» Serve immediately 🙂 Yum!
Tags:creamsicle, gluten-free, orange, orange Julius, pregnant, smoothie, soy-free, Vegan
Posted in Breakfast, Desert, Lunch, Recipes | Leave a Comment »
May 14, 2013
A short update on the gluten challenge – I did the 90 days and got my blood-work done. The tests came back negative for Celiac Disease. Initially we planned on doing a biopsy as well, but that’s just not feasible at the moment, so since we already know I am gluten intolerant I’ll be avoiding gluten again.
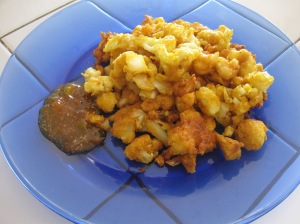
Now…Dinner tonight was one of our favorite not so healthy meals…cauliflower pakora (an Indian dish,) which reminds us of popcorn chicken!
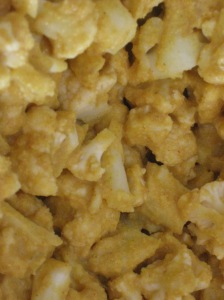
 Pakora
Ingredients:
- 2 cups chickpea (garbanzo) flour (milling dried chickpeas works)
- 1 teaspoon ground coriander
- 2 teaspoons salt
- 1 teaspoon ground turmeric
- 1 teaspoon chili powder
- 1 teaspoon curry powder
- 4 cloves of garlic, crushed
- 1.5 cups of water
- 1 large head of cauliflower chopped into bite sized pieces
- 1 large onion diced
- 2-6 cups of oil for frying (I use olive oil)
Directions:
- Blend together all ingredients except for the cauliflower, onion, and oil. The batter should be smooth, and slightly thick.
- Stir in the chopped cauliflower and diced onion until coated with batter
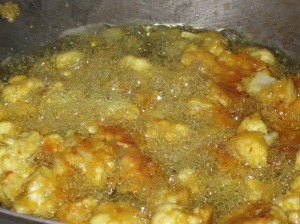
- Heat the oil in a heavy pan to 375*F (We use a wok with a couple of inches of oil in it.)
- Fry in batches for about 4-5 minutes, until golden.
- Removed to a paper towel lined bowl or plate to drain.
- Serve hot with optional chutney like sauce (recipe below.)
Chutney (may bear very little resemblance to actual chutney since I’ve never had it, and sort of made this up randomly.)
Ingredients:
- 1 half cup of apricot preserves (check the ingredients for any ingredients you might need to avoid)
- 1-2 teaspoons of juice from canned or jarred jalapenos. (optionally include a few bits of diced jalapeno)
- 1 teaspoon onion powder
- dash of powdered ginger
Directions:
- Combine all ingredients thoroughly and serve as a dipping sauce for pakora
The pakora (vegan popcorn chicken) works great in a big bowl shared during a movie or party. Stay tuned for how to use cauliflower as a buffalo wing substitute!
Tags:cauliflower, gluten-free, pakora, party food, soy-free, Vegan, vegan popcorn chicken
Posted in Dinner, Party Food, Recipes, Special, Veggies | 5 Comments »
March 21, 2013
Today a friend gave us five pounds of Asian Sweet Rice Flour. I know that many things I’ve gotten in Asian restaurants is made with this, my favorites being Sesame Seed Puffs and Mochi. In looking for recipes (that wouldn’t need too much tweaking) I found THIS website. Not everything there is vegan, and several of the recipes have ingredients that I can’t eat, but the recipes I really want to try, and that are good as they stand are:
Sweet Coconut Rice Balls (without the food coloring.)
Dim Sum Wrappers (Sweet or Savory.)
Sesame Seed Puffs (Though I can’t eat the bean paste, and am also not sure what to use instead of the vegetable shortening if you did make it…possibly Earth Balance Soy Free Buttery Spread would work, but I’ll need to think of an entirely different filling.)
Tikoy (I had to look up what this was, and found a slightly different recipe that has more thorough instructions, including a video.) It’s not in pure English, but watching and listening I was able to make sense of it.
Coconut Mochi
Another type of Mochi (Dila-Dila)
I’m excited to try some of these, and I’ll keep you posted on the results! Hopefully I remember to take pictures before I eat them all…I’ve made a few things recently but keep forgetting to take pictures! I’ll just have to make them again and make it a point to take pictures.
(I’m still in the middle of my gluten challenge, and will keep you posted once I get testing and diagnostics done.)
http://gfrecipes.com/glutrice.htm is the main URL in case the links above didn’t work
Tags:Asian, Dila-Dila, gluten-free, Mochi, Sesame Puff, soy-free, Sweet Rice Flour, Tikoy, Vegan
Posted in Desert, Recipes | Leave a Comment »
January 15, 2012

Ok, so they don’t look as good as the ones here, but for a first try, they look gorgeous to me, and tasted yummy!
I’ve been wanting bagels even more than I’ve been wanting regular bread (no luck yet on a loaf recipe that works yet.) I started looking around for a vegan, gluten free, soy free bagel recipe that I could eat that had the right kind of qualifications. I grew up in NY so am picky as to what constitutes a bagel. A flour with a strong flavor wouldn’t do it. A recipe that isn’t boiled first wouldn’t do either. Then I found Kelli & Peter’s recipe. They’re from NY, so know what a real bagel is. None of the flours are strong flavored, and it didn’t need to be cinnamon raisin to cover up the odd flavor. There were only a couple of very small changes needed to make it vegan. I had everything on hand (well almost,) so gave it a go.
The original recipe is gluten free and soy free. It can be found at NoGlutenNoProblem. The changes I made were as follows:
Instead of egg whites in the bagel I use Ener-G egg replacer. For the egg wash I used extra virgin olive oil. I didn’t have quite enough potato starch, so used 20g potato starch and 17g arrowroot powder to make up the difference. The flour blend is listed here. For all of the flours and starches in the blend I used Bobs Red Mill brand.
The bagels were great straight out of the oven, and half an hour later. I will be making a multiple batch the next time I make these as long as they freeze well. I guess I have to freeze one of these (I ate two already!) to see if they’ll do well being frozen then thawed. I ate them with some soy free Earth Balance and they made my mouth happy and won’t upset my gut. I made two plain, one onion, and one sesame. I ate a plain bagel and the onion bagel for dinner. I’m just so excited, and I hope you enjoy them too!
Tags:bagel, celiac, gluten-free, soy-free, Vegan
Posted in Dinner, Lunch, Recipes | 12 Comments »
August 31, 2011
The other day my husband and I stumbled upon a happy accident. While mixing up a mix for veggie burgers I tasted the mix, and it tasted like a mild tuna salad to me! A couple of modifications, and instead of waiting for burgers to cook, we had a cold lunch of “tuna” salad. Not a bad thing since it’s been hot out and I was hungry!

Vegan Tuna Salad
Ingredients
- 1 cup raw, hulled sunflower seeds, ground
- 1 cup cooked brown rice
- 2T ground flax seed
- 2/3 cup chopped carrot
- 2/3 cup chopped celery
- 1/4 cup chopped green onion
- 2T water
- 1/8 – 1/4 cup dried Nori or Kelp – Roasted (Roast at 300* for 5-8 minutes, crush and mix with 2-3T warm water)
Directions
- Combine all ingredients into a large bowl
- Process with a stick blender or food processor leaving slightly chunky
- Refrigerate until cold
- Serve on a bed of lettuce with vegan mayonnaise (see recipe below,) or any way you’d serve tuna.
- Makes 4 servings
Vegan Mayonnaise/Sour Cream (Also Raw!)
Ingredients
- 1 cup raw sunflower seeds
- 1 1/4 cups water
- 4T lemon juice
- 1t onion powder
- 1/2t garlic powder
- 1t salt
Directions
- Blend all ingredients in a blender on high speed until creamy (a vitamix works well)
- Refrigerate until cold

A delicious lunch. A bed of fresh baby romaine lettuce leaves, tomato wedges, a scoop of vegan “tuna” salad topped with dollops of homemade vegan mayonnaise.
Tags:celiac, gluten-free, mayonnaise, raw, recipe, soy-free, tuna, tuna salad, Vegan
Posted in Dinner, Lunch, Recipes | Leave a Comment »
January 2, 2011
 One of the hardest things for me, is that all of the pre-made vegan crumbles (Boca, Morningstar, etc.) are soy and gluten based. I like having some non-bean texture in my tacos, and something other than “just veggies” on a pizza or pasta dish. This recipe is adapted from the recipe “Walnut Wheat Crumbles” in the cookbook “Tasty Vegan Delights.” It works equally well with millet or quinoa, though millet takes longer to cook initially, and I like the flavor of quinoa better, as well as it being a complete protein.
This recipe doubles easily (and if you have room for more pans in your oven, could be multiplied even more, though I can only fit a double recipe in my vita-mix at a time.) It’s a good recipe to start in the morning on a day when you’ll be home most of the time, and won’t need the oven for anything else. I usually start it around lunch time, and stir the crumbles in the oven every hour or so, until I go to bed, then I turn off the oven and leave the pans in overnight. By morning they are done!
Quinoa Crumbles
Ingredients:
- 1 cup walnut or pecan pieces, or meal (meal is less expensive, and we’ll be pulverizing it anyway, but I usually get walnut pieces)
- 4 1/2 cups of water (divided into 1 cup, 1 cup, and 2 1/2 cups)
- 1/4 cup onion powder
- 3t garlic powder
- 1t salt (I use sea salt that still has the minerals in it for better nutrition and flavor)
- 2 cups quinoa (or millet)
Directions:
- In your vita-mix combine the nuts and 1 cup of water, and blend on high until smooth.
- Add another 1 cup of water, and the onion powder, garlic powder, and salt, and blend to combine.
- Pour the mixture into a pot (a single recipe needs about a 3 quart pan, and if you double it, keep in mind it does foam, and it does expand, so make sure your pot is big enough!
- Add the last 2 1/2 cups of water, and bring the mixture to a boil.

Boiling on the stove...don't let the light color fool you, these will be nice dark brown crumbles!
- Add the quinoa or millet and cook until most of the water is absorbed. (When it starts to look like a porridge or oatmeal consistency.) Quinoa took about 20 minutes for me, and the millet took a lot longer.
- Remove the mash from the heat, and let it cool for a while (about 1/2 an hour or so) and it will thicken more
- Divide the mixture into a couple of pans: Cookie sheets with a lip edge work well, but large (9″x13″ or so) casserole dishes work too. If you have only smaller pans, us more of them. You don’t want the mixture to be too deep in each pan.

Here they are, still quite wet, but looking a bit more brown.
- Put the pans in the oven at 200*
- Stir every hour our so, flaking and fluffing the crumbles as they dry. If you have pans on multiple racks you’ll want to rotate them as well (move the ones from the bottom to the top, and vice versa.) Do this for about 6 or 7 hours. They should really be getting darker brown and crunchy.
- Turn the oven off, leave the door closed, and go to sleep. In the morning, you’ll have perfect crumbles. Divide them into freezer bags, and freeze them.
- A single batch makes enough for the equivalent of 2# of “browned ground beef.”

A generous 2 cups of crumbles is just about equal to a pound of "browned ground beef"
Using them:
I prefer them to have a bit of crunch, so I don’t add a lot of liquid back to them. If you use them in a recipe that has liquid already (like chili) there’s no need to reconstitute them at all. I recommend adding them towards the end of the cooking time.
If you want to reconstitute them (say for sloppy joes or tacos):
- Put 2 cups of crumbles into a small pot.
- Choose a liquid you’d like to use (water is fine, but for more flavor you might want to use broth or soup. For tacos I use salsa!) You’ll need up to 2 cups of this liquid.
- Add the liquid a little bit at a time, stirring it in.
- When the crumbles are the consistency you like, stop adding liquid, and use them in your recipe!
I use them crunchy in “nacho” type dishes, stir them into chili just before serving, or mix them into homemade tomato sauce the last minute or so of cooking.

I made a double recipe, and so packaged it into 4 "pound" packets of about 2 1/4 cups each. Don't forget to label them! They're ready for the freezer now (or to use!)
This recipe could easily have other seasonings put in from the beginning, if you know you’re going to use it for a specific type of dish. I think if I found a “smoke” flavor that was safe for me to eat, adding that would make these work as a “bacon bit” type crunchy topping for baked potatoes or salads. I do that with them as they are anyway. Let me know your favorite ways to use these crumbles, or your favorite variations. Enjoy!
Tags:celiac, crumbles, gluten-free, ground beef substitute, nuts, quinoa, soy-free, Vegan, vegetarian, Vita-mix
Posted in Dinner, Lunch, Recipes | 23 Comments »
December 21, 2010

For those of you who like gingerbread, here’s a recipe my husband made, that I can eat! (I’m actually not a huge fan of gingerbread, but this was good.) I’m sorry the picture is tiny and harsh, he took the picture for me with his camera, and I’m having issues getting pictures off of my camera, but I think I have a couple of it sliced, and if I get them I’ll add them to the post. He also further altered it to make me a birthday cake, and while definitely a dense cake (no angel food here!) it’s very moist. When I get him to cough up those alterations as well, I’ll post those too!
Ingredients:
- 1/2 cup quinoa flour
- 1 cup All purpose, gluten free flour (I use Bob’s Red Mill)
- 3/4 cup brown rice flour
- 1/2 cup potato starch
- 2 1/4 teaspoons xanthan gum
- 1 teaspoon baking soda
- 1 teaspoon baking powder
- 2 teaspoons ground ginger
- 1 teaspoon ground cinnamon
- 1 teaspoon ground cloves
- 1 teaspoon nutmeg
- 8 Tablespoons Earth Balance (soy free! They DO make it.)
- 1/2 cup packed dark brown sugar
- 1/2 cup evaporated cane juice
- 3 teaspoons “Ener-G” egg replacer mixed with 4 Tablespoons of water (or egg replacement of your choice to equal 2 eggs)
- 1/2 cup molasses
- 3/4 cup almond milk + 1 tsp lemon juice
- 1/2 cup hot water
- Preheat the oven to 350°.
- Grease a loaf pan then line the pan with parchment paper, including the sides. Let it hang over a bit to give you “handles” to take it out later. Also grease the paper (just where the batter will end up touching, not your “handles.)
- Combine the dry ingredients well (the first 11 ingredients on the list) thoroughly in a bowl, and set aside.
- Combine the butter and sugars into a bowl and whip with an electric miser until fluffy.
- Add the Ener-G mixture to the butter/sugar mixture, and mix some more until that is also combined.
- Add the molasses and curdled almond milk to the butter/sugar/egg mixture.
- Mix the flour mixture into the wet ingredients about 1/2 cup at a time, incorporating it before you add more.
- Finally add the hot water and mix some more.
- Pour the batter into the greased loaf pan (you’ll need to spread it out, but don’t worry about getting it perfectly flat.
- Bake for about 40 minutes or until a toothpick poked into the middle comes out clean.
- Let it cool, then lift out, and eat!
This recipe was inspired by this one (which isn’t vegan, but is gluten free.)
Tags:Bobs Red Mill, cake, celiac, Desert, gluten-free, soy-free, Vegan, vegetarian
Posted in Baked Goods, Breakfast, Desert, Recipes | Leave a Comment »
December 3, 2010
I haven’t posted in a while because typing is an issue at the moment. Long story short – a tendon injury on my right wrist/thumb. I have a few recipes to put up as I can type more, but this one just couldn’t wait. Growing up with Jewish grandparents I loved latkes, but never tried to make them. There was always someone else to do it! This year I decided to make them, and sought a recipe. I found this one at About.com, and with a few changes (and added details) they came out perfect…unfortunately they were eaten as I cooked them, so the proof is in my stomach, and we don’t want a picture of that!
Just in case the link doesn’t work, here is the recipe, copied exactly from that website:
This vegan latke recipe uses an
egg replacer to make traditional potato pancakes.
Prep Time: 15 minutes
Cook Time: 15 minutes
Total Time: 30 minutes
Ingredients:
- approx 3 pounds of potatoes
- 1 onion, finely chopped
- 2 “eggs” (use Ener-G Egg Replacer)
- 1 teaspoon salt
- 1/2 teaspoon pepper
- 3 tbsp flour
- 1 tsp baking powder
- oil for frying
Preparation:
Grate the potatoes into a large bowl, or, if you have a food processor, it works well for this task, just process until fine.
Add remainder of ingredients, except oil, and combine well. Heat a few tablespoons of oil in a frying pan and drop potato mixture onto pan in small amounts, flattening to form pancakes.
Cook until golden brown, then flip. Be sure the potatoes get cooked all the way through. Serve with applesauce and enjoy!
A change, and some details to make it easier:
- Bobs Red Mill Gluten Free Baking Mix absolutely works in this, as does the Ener-G egg replacer. The cooking instructions were a bit vague, so to clarify (for you to benefit from my burnt and raw tries)
- Use a heavy frying pan (the cast iron worked beautifully!)
- Get it hot, and get the oil in the pan hot before trying to cook these.
- Once the pan is heated, I turned the heat to “3” on my electric stove.
- Squeeze excess water out of each “blob” before putting it in the pan. (A serving spoon heaped is about the right size…the size you’d use for a side dish, not a large cooking spoon…a bit bigger than a tablespoon)
- Drop the blob into the hot pan, and smush it together into a pancake shape and thickness.
- Cook the one side until the edges start to brown (you can see that before lifting the latke)
- Flip carefully, and brown the other side, peeking after a minute or so.
- Make sure you keep enough oil in the pan to keep them from sticking, and to help fry them.
- I was out of applesauce, but pear sauce worked just as well, and my husband likes them with tomato soup (which since it’s the canned name brand type, has gluten…why, I don’t know.)
So have a happy Hanukkah with latkes! 🙂
Tags:fry, gluten-free, Hanukkah, latke, potato, soy-free, Vegan, vegetarian
Posted in Breakfast, Lunch, Recipes, Special | 1 Comment »
November 8, 2010
Today was a dreary, cold and rainy day, and I wanted cookies, so I handed my husband the “Vegan Cookies Invade Your Cookie Jar” book he’d gotten me for Christmas last year, and asked him to pleeeeeaaase make me cookies. He agreed (YAY!!!) and decided to try making the Black & White cookies, soy and gluten free. (Such a sweet husband…he remembered that when we met I used to always get Black & White cookies…it’s a NY thing I think.) First he substituted Bobs Red Mill All Purpose Gluten Free Flour for the flour in the recipe. He also used my doTerra essential oils instead of lemon and orange extracts. He substituted soy milk for almond milk, and mixed up the batter. It smelled right, so onto a cookie sheet and into the oven the first 3 went. This is one of the resulting cookies from that batch. If you know Black & White cookies, they are very cakey…a soft chewy cookie.

Very much NOT a cakey cookie
They came out crunchy, crispy and crumbly. The flavor wasn’t bad, but the texture was very far off. Perhaps it was the gluten free flour, or the fact that we’re at a high altitude (about 5000 feet) but these were not turning out to be what we were hoping for. Now I can’t take credit for the fixes, as that was all him, which resulted in an entirely different recipe all together, and it definitely worked! So this may have to be a “Vegan, Soy & Gluten Free at High Altitude” Black & White Cookie Recipe!
Ingredients for the Cookies:
Directions for Cookies:
- Preheat oven to 350*
- Line two cookie sheets with parchment, or use two silicon baking sheets.
- In a small bowl combine Ener-G egg replacer with water.
- In a medium bowl, combine the almond milk and lemon juice and let curdle for 1 minute.
- Add the oil, sugar, vanilla, lemon, and orange to the almond milk mixture and whisk well.
- In a large bowl (I never said this was a one dish recipe…it made lots of dirty dishes!) mix together the dry ingredients except for the xanthan Gum (that would be the flour, cornstarch, baking powder, baking soda, and salt)
- Gently pour the wet ingredients (from the medium bowl) into the dry ingredients (in the large bowl.) Stir thoroughly. Add the xanthan gum and Ener-G “egg.” Mix well.
- Use an ice cream scoop (or a 1/4 cup scoop) to plop the cookies on the sheet. Leave some space (maybe 2″ between them) as they mostly puffed UP and not OUT.
- Bake for 16-18 minutes until cooked through. (The toothpick trick works well for this – if you insert a toothpick in the middle of the cookie and it comes out doughy, they aren’t done yet!)
- Remove the cookies from the oven, and flip them onto a cooling rack (or a wooden cutting board…since we don’t have a cooling rack) and let them cool while you make the icing.

Cookies starting to be iced
Ingredients for Icing:
- 4c powdered sugar
- 1/4c (plus a few table spoons “just in case”) boiling water
- 2 drops vanilla extract
- 2T carob powder
- 1t salt
Directions for Icing:
- Pour 1/4c of the boiling water into the powdered sugar in a medium bowl, and whisk together. Add the 2 drops of vanilla. Mix until it’s a thick glaze.
- Spoon this glaze over one half of each cookie.
- There should be some icing left. To that add the carob powder and salt, and whisk well.
- Spread this glaze over the other half of the cookie.
- Let the cookies sit for a few minutes to let the glaze set.
- Now they’re ready to eat! (And they don’t store very well, but if you keep them in an airtight container, and cool, they do ok for a couple of days.)

All done! (but one's missing...)
So, the cookie recipe started out as being from “Vegan Cookies Invade Your Cookie Jar” but evolved much. The white icing is exactly from their book (but it IS a standard glaze recipe) and the carob is ours. Let us know what you think!
This made about 12 cookies, and I can usually only eat about half of a cookie at a time, so it could be 24 servings easily!

My husband caught me eating my cookie...yummy!
Tags:baking, Bobs Red Mill, cake, carob, celiac, cookie, Desert, doTerra, gluten-free, high-altitude, soy-free, Vegan, vegetarian
Posted in Baked Goods, Recipes | 4 Comments »


